Pumpkin Spice Energy Bites

I always pick up a few extra cans of pumpkin puree in the fall because it is highly nutritious and it can be used for a lot more than pumpkin pie. One of my favorite things to add pumpkin to is my oatmeal along with pumpkin pie spice, some chopped walnuts, and a little drizzle of maple syrup. Yum!

Libby's 100% Pure Canned Pumpkin Puree, 29 Oz | Pie Crust & Filling |  Foodland Super Market (Hawaii)

These pumpkin spice energy bites are another way to get more of this healthy food into your diet. Canned pumpkin is fully cooked so there is no baking required! I am also including a great recipe to make your own pumpkin pie spice.

You can watch me prepare this recipe here.

Pumpkin Spice Energy Bites

  • 1/2 cup canned pumpkin puree
  • 1/4 cup maple syrup
  • 1 teaspoon pumpkin pie spice (see recipe below)
  • 1 teaspoon vanilla
  • 1 cup dry quick cooking oats
  • 1/3 cup ground flax seed meal
  • 1/2 cup chopped toasted pecans
  • 1/3 cup reduced sugar dried cranberries

Combine the first four ingredients in a medium bowl and mix to combine. Add the oats and the flax seed meal and mix thoroughly. Stir in the pecans and cranberries until they are well distributed. Portion the mixture into balls using a 1 1/2 inch cookie scoop or tablespoon. Roll each ball lightly in your hands to even out any rough edges. Chill.

These will hold in the refrigerator for 2-3 days or can be frozen.

Here is the recipe for the spice:

Pumpkin Pie Spice

  • 3 Tablespoons cinnamon
  • 2 teaspoons ground ginger
  • 2 teaspoons ground nutmeg
  • 1 teaspoon ground allspice
  • 1 teaspoon ground cloves

Combine and mix well. Store at room temperature.

Mango, Black Bean, and Avocado Salad


mangoblackbeansalad2

Sometimes the simplest combination of ingredients can give you the most delicious results. This salad is a great example.


There are no exact measurements.  For one “batch” I use one good sized avocado, one good sized mango, and one can of black beans.  A bit of diced red onion and chopped parsley round out the solid ingredients.  The dressing is simply lime juice. The trick of letting the onion sit in the lime juice while you prepare the other ingredients helps to tame its raw bite. The lime juice also helps keep the avocado from oxidizing.

Avocados and mangoes can be a little intimidating if you don’t know a few tricks. In my YouTube video for this recipe I show two methods for easily separating the peels and pits from both.

mangoblackbeansalad3mangoblackbeansalad4


This makes a great side dish for a Mexican inspired meal or it can stand alone as a light lunch.  You could add a grain, like quinoa or rice to make it a bit more substantial. And you could easily convert it into a salsa by dicing the avocado and mango a bit finer and adding a finely minced jalapeno.  Great with chips or as a topping for grilled chicken or fish.

mangoblackbeansalad1

Here is the recipe.

Ingredients

  • 2 limes
  • 2-3 tablespoon red onion, finely diced
  • 1 ripe avocado
  • 1 ripe mango
  • 1 can black beans, rinsed and drained
  • 2 Tablespoons diced parsley or cilantro

Grate the zest from one of the limes into a medium bowl.  Squeeze the juice of both limes into the bowl.  Add the red onion and stir. Slice the avocado in half and remove the pit.  Remove the skin and cut the avocado into bite sized pieces. Add to the bowl and give it a gentle mix. Slice the mango along each side of the pit.  Cross hatch the flesh of each half, turn inside out and slice the cubes away from the skin into your bowl.  Or use the neat trick of separating the skin from the flesh with a drinking glass. Add the parsley, mix, and serve.  This is best eaten the same day it’s made but it can store a day or so in the refrigerator. Makes 2-3 servings.

If you make this recipe please let me know how it turned out!


Baked Zucchini Fries w/ Quick and Easy Marinara

zucchini8

I like to eat fruits and vegetables when they are in season and at this time of year there is nothing more seasonal than zucchini.  These baked zucchini fries are easy to make and the marinara sauce is a perfect accompaniment.

Smaller zucchini work best for this recipe. The larger the zucchini the more water it contains and the larger the seeds. Those two issues aren’t compatible with a crispy end product.  If you only have a large zucchini, try using the narrow end and save the larger, bulbous end for bread and zucchini noodles.

I like to cut the zucchini into wedges.  This makes them easier to brush and coat and they stand up on the baking sheet so you don’t have to turn them over halfway through baking. Mayonnaise provides the “glue” to stick the crumb coating on the fries.

As I mentioned, zucchini contain a lot of water. The longer you bake these fries, the softer they will get.  Bake them just until the coating is a nice golden color and eat them while still warm.  They don’t hold well and for that reason I like to make the marinara sauce first so it’s ready when the fries come out of the oven.

The sauce is made with ingredients you may already have in your pantry. It’s something you can whip up any time and I prefer it to jarred or canned varieties.  Plus, you control the ingredients; no salt, sugar, oil, preservatives, etc.  My recipe has a little bit of a kick from the red pepper flakes.  It makes a great dip for the fries and of course as a sauce for your favorite pasta.

marinaraing

Here are the recipes.  You can watch me prepare both recipes in this video.

Quick and Easy Marinara 

  • 1 1/2 cups vegetable broth
  • 2 – 6 oz. cans tomato paste
  • 2 tablespoons maple syrup
  • 1 1/2 teaspoon dried oregano
  • 1 1/2 teaspoon dried thyme
  • 2 teaspoon garlic powder
  • 1 1/2 teaspoon onion powder
  • 1 teaspoon dried basil
  • 1/4 teaspoon red pepper flakes

Bring the broth to a boil in a medium saucepan over high heat. Reduce the heat to low. Whisk in the remaining ingredients. Cover and simmer for 10 minutes, stirring occasionally. Serve warm or refrigerate up to one week.

Baked Zucchini Fries

  • 3 small zucchini
  • 2 Tablespoons mayonnaise
  • 1 cup Italian seasoned bread or panko crumbs (I prefer panko; it’s crispier)
  • 2 tablespoons grated Parmesan cheese

Preheat oven to 400F.  Cover a baking sheet with parchment paper. Mix the bread crumbs and Parmesan in a shallow dish.  (A pie plate works great!) Cut the zucchini lengthwise into wedges.  Brush each cut side with mayonnaise, one at a time.  After each fry is brushed place it in the plate of bread crumbs. Turn and press the fry to coat it with crumbs and move it to the baking sheet.   Bake for about 20 minutes until the coating is golden. Serve with marinara.

NOTE: I use this same recipe for “fried” green tomatoes and for eggplant slices which can be used as the basis of a healthy version of Eggplant Parmigiana.

Look for more healthy recipe videos on the CGH website. I’d love to know if you try any of them.

Peanut Butter Cake in a Cup

PBcake2

The first time I encountered a recipe for a single serving microwaveable cake my first thought was “Genius!” It can be kind of dangerous to bake a whole cake when you live in a two person household like I do. When I saw that I could bake a little cake just for me I was definitely on board. I have since baked them as quick treats for my husband or friends. I even baked one for the dog on his birthday (minus the sweetener).

There are many different recipes for these cakes on the internet. Just search for microwave mug cakes. This healthy version is made with whole grains, natural peanut butter, and lightly sweetened with honey. You might even consider making it for breakfast if you roll that way.  

PBCake1

These would also be great to make with the kids. They can each mix and bake their own cake. Since the microwave time is just 90 seconds no one has to wait too long until it’s their turn to bake and eat.

A small ramekin, souffle cup, or coffee cup works well for this. Make sure to choose a mug that is safe for the microwave. For this recipe an 8 ounce size works best. It allows the cake to rise just over the top of the cup.

When it comes to peanut butter I always choose a natural version with as few ingredients as possible. My favorite one has just peanuts and a little bit of salt. Many commercial brands add sugar, hydrogenated vegetable oil, or palm oil, among other things. The hydrogenated/palm oil keeps the peanut butter from separating but it also adds unhealthy saturated fat that is not good for your heart. A natural peanut butter means you might have to mix it up a little for the first use but here’s a tip. Store it upside down in the refrigerator after mixing and it should stay mixed.

krogernatural
My favorite peanut butter…     and it’s cheap!

I love using honey as a sweetener when I’m making anything with peanut butter. If you don’t have honey you could substitute some maple syrup or a tablespoon of white or brown sugar. An even better match for peanut butter is chocolate so I tossed in a tablespoon of dark chocolate chips. Totally optional but highly recommended!

This cake “bakes” in the microwave at high power for just 90 seconds. Since everyone’s microwaves are different you might want to cook for 75 seconds and check. If the cake still looks a bit “wet” in the center return it to the microwave and cook for another 15 seconds. Repeat in 15 second intervals if necessary. Your cake should look fully risen and dry to the touch when done. It should spring back when touched lightly. Don’t overdo it or you will end up with a peanut butter flavored rubber ball.

You are less than 5 minutes away from a warm peanut butter and chocolate chip cake. If you’d like to see a video of me preparing this cake, check out this YouTube video. Here’s the recipe:

Recipe

  • 3 Tablespoons whole wheat flour
  • 1/2 teaspoon baking powder
  • 3 Tablespoons natural creamy peanut butter
  • 1/2 teaspoon vanilla
  • 1 Tablespoon honey
  • 1/4 cup milk (I used soy milk but any kind of milk will work)

Add the flour and baking powder to the cup and mix. Add the peanut butter, vanilla, honey, and milk and mix well. Fold in the chocolate chips. Microwave on high power for approximately 90 seconds. Remove from microwave (careful: the cup will be hot!) and let sit for 2-3 minutes. Best enjoyed while warm.

You probably have everything in your pantry to make this cake right now. Bake one up and let me know what you think. Go ahead. I’ll wait.


Easy Black Bean Burger

Here’s an easy recipe you and the kids can enjoy making and eating together.  It has just a few simple ingredients, it’s easily customizable, and can be cooked in multiple ways. It also combines two of the healthiest foods on the planet, beans and oats!

burgeringredients

It starts with a can of black beans.  Choose the lowest sodium variety you can find, even though the beans will be drained and rinsed.  Canned foods like beans and vegetables are notoriously high in sodium and even if you rinse them they retain a lot of it.

The recipe call for quick oats. If you don’t have any quick oats you can make them by pulsing whole old fashioned rolled oats in a high speed blender.  It takes 5 or 6 pulses to get them to the right consistency.

Here’s where the customization comes in.  Choose a mild, medium, or hot salsa depending on your family’s preference but keep in mind that you will be adding another level of spice with chili powder and adobo sauce from a can of chipotle peppers if you choose to use it.  The adobo sauce also adds smokiness. If you don’t want to use it you can get some smoky flavor with a few drops of liquid smoke or by using chipotle chili powder.

You can also add some chopped bell pepper or some corn to these burgers. Feel free to experiment!

burgerpatties

The burgers can be cooked by baking them in the oven or by searing them in a cast iron pan.  If you have an air fryer you can experiment with cooking them in that; it should make them nice and crispy.  As long as the outside of the burger is crisp and the inside is fully heated they should be good.

The Southwest flavors pair nicely with avocado as a topping but there are a lot options that would work well.  Try some additional salsa, sliced jalapenos, tomato, lettuce, you name it. Or just stick with ketchup and mustard.

finburger


You can watch a video of these burgers being prepared on the CGH YouTube channel.

Recipe:

  • 1 can (16 ounces) black beans, rinsed and drained
  • 1 cup quick oats
  • 3/4 cups salsa
  • 1 tablespoon adobo sauce from a can of chipotle chiles
  • 1/2 teaspoon garlic powder
  • 1/2 teaspoon cumin

Add beans to a large bowl and mash until there are very few whole beans remaining.  Add remaining ingredients and mix to combine thoroughly. Place mixture in the refrigerator for 15 minutes to chill.  Meanwhile, heat oven to 375F if you will be baking the burgers.

Cover baking sheet with parchment paper. Scoop mixture onto baking sheet using a 1/2 cup measure. Flatten patties with the bottom or the cup or with your hands.  Bake for 25-30 minutes.

You can create your patties and freeze them before cooking.  Just make sure to thaw them in the refrigerator overnight before cooking.  Other methods of cooking include searing in a fry pan on the stovetop or using an air fryer.  Direct grilling is not recommended. To grill them use a sheet of non stick aluminum foil on the grill.


Mock Guac

I consider myself a bit of a guacamole connoisseur. I’ve tried everything from the commercial brands in the supermarket to those freshly prepared at tableside in high end Mexican restaurants.  Some guacamole recipes are as simple as mashed avocadoes with a little lime and salt, while others typically add chopped tomato, onion, jalapeno, etc.  My favorite quick recipe came from a native Texan who told me to simply mix some fresh salsa into mashed avocado.

All of these recipes have one thing in common. They start with avocado. In fact, there are some people who believe it’s a travesty to suggest that guacamole could be made with anything but.  In 2015 the New York Times published a guacamole recipe that replaced just a portion of the avocadoes with green peas and it set off a war on Twitter. I’ve been wanting to try it ever since!

Regardless of your feelings about guacamole there are disadvantages to avocadoes.  Some people just don’t like them (I know, really?). Avocadoes can also be expensive, they are high in calories, and sometimes the fickle things can go from rock to overripe in a matter of hours.

Therefore I give you this recipe that substitutes green peas for the avocado entirely. The peas offer solid advantages. Frozen peas are readily available, can be kept for a long time, and they are very inexpensive, not to mention much lighter in calories than avocado.

I have christened this recipe “Mock Guac” so as not to offend any guacamole snobs but if there are any out there you might be surprised to find out how much you enjoy this lighter, fresher preparation.  Here’s how I made it.

IMG_0378

This recipe starts with frozen peas. Most frozen vegetables are blanched before freezing so they can be eaten without any additional cooking. I use thawed frozen peas and corn in salads and other recipes frequently.  It only take a minute or two of rinsing under cold water to get them ready.

IMG_0379

Once the peas are thawed you can prepare your jalapeno and onion. Slice off the stem end of the jalapeno, cut it into quarters lengthwise, and use your knife to separate the white pith and seeds. Cut each quarter into very thin strips and mince.  Beware the size of jalapeno you use. It can make a big difference in the heat level in your recipe.  I’ve seen some giant ones in the grocery store lately.  I used one that was on the smaller side.

If you’ve never handled raw jalapenos I will warn you that you must wash your hands thoroughly afterward!  Even then be careful of touching any sensitive body parts. I once took my contacts out not long after dicing jalapenos and even though I had washed my hands it was painful!

I know that there are cilantro haters out there.  Since this is not a traditional recipe I think you could try parsley or mint instead. Both would go well with the peas. I do think lemon makes a better match with the peas than lime would. Using both lemon zest and lemon juice gives a nice citrusy pop and one fresh lemon gives just enough zest and juice for this recipe.  Just be sure to zest the lemon before slicing.

IMG_0393

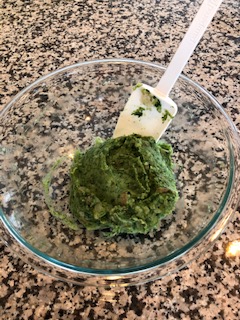
Now all the hard work is done.  Everything goes in the food processor at once. Use the pulse feature to blend the mixture until you get to the right guacamole consistency.  I didn’t want any whole peas to be visible and that took at least 10-12 pulses.

IMG_0399IMG_0402

I served my Mock Guac with homemade tortilla chips.  Just cut white corn tortillas into triangles, brush with a little olive oil on both sides, and bake in a 375 degree oven for 8-10 minutes; turning halfway through. Sprinkle on salt immediately after removing from the oven.

IMG_0405

Here’s the recipe. If you try it give me a shout and let me know what you thought.

Mock Guac

  • 1 – 13 oz. bag frozen sweet peas, thawed
  • 2 cloves garlic, sliced thin or pressed in garlic press
  • 1 jalapeno pepper, cleaned, seeded, and minced
  • 2 Tablespoons diced fresh onion
  • 1/3 cup fresh cilantro leaves
  • 1 Tablespoon olive oil
  • 1 teaspoon lemon zest
  • 2 Tablespoons fresh lemon juice
  • 1/2 teaspoon salt
  • 1/2 teaspoon cumin
  • 1/2 teaspoon crushed red pepper

Combine all of the ingredients in a food processor and use the pulse feature to process until the mixture resembles guacamole. It should be creamy looking with just a slight hint of texture.  Serve with tortilla chips, fresh vegetables, or as a wrap filling.

Whether you consider this guac or not, it’s a tasty dish with fresh flavors that can be enjoyed any time.


Sneaky Green Potato Puffs

Health conscious people know that dark green leafy vegetables are among the healthiest foods on the planet. I try to make sure I get at least one serving every day. For me that means salads, the occasional green smoothie, and I often add greens to soups, stews, and casseroles.

While I enjoy and appreciate greens, I know they are just not everyone’s cup of tea. So, I’m always interested when I find a recipe that incorporates greens in a way that would make them palatable to just about anyone.

Enter these potato puffs. I’ve christened them “Sneaky Green Potato Puffs” because they pack a lot of green goodness into a food that almost everyone loves. They are easy to make and they are delicious!

The recipe is flexible; you could use many different greens like kale or baby spinach. I used arugula because it was what I had on hand. The “puff” comes from the addition of potato starch but corn starch or all purpose flour could be used instead. I used russet potatoes but I think other varieties of potatoes could work as well. The nutritional yeast adds a cheesy flavor. If you don’t want to use it you could substitute some grated Parmesan cheese.

IMG_2745

The first step is boiling the potatoes. You can peel them if you like but I never do. The peel contains fiber and vitamins and you really won’t notice it much in the final product.

IMG_2746

The next time I make these I think I’ll try steaming the potatoes instead of boiling. That will preserve a bit more of the nutrition in the dish. The greens are cooked in the same pan as the potatoes and a small amount of the cooking liquid is used to moisten the final mixture. The boiling method resulted in lots of green water going down the drain. I really hate watching vitamins go down the drain.

IMG_2747

The next step is processing the greens in a blender. This processing step helps to hide those greens even better. I used my high powered blender for this. I left some texture in the mixture but you could process it a bit more depending on your preference.

IMG_2748

The potatoes are mashed in the mixing bowl and everything else gets mixed right in. See, I told you it was easy. And look at that green color!

IMG_2752 IMG_2753

I scooped the mixture onto a parchment paper covered baking sheet with my one inch cookie scoop. This was the perfect size for a one or two bite treat.

IMG_2751 IMG_2754

They do indeed puff a bit after baking and they have a nice soft texture when you bight into them.  You could serve these as a side dish to a meal but I think they would also make a great appetizer. You could mix them up a few hours ahead of time and keep in the refrigerator until it’s time to scoop, bake, and serve. They taste great warm or at room temperature.

IMG_2755

I hope you enjoy another way to get some greens for yourself and your family. Here’s the recipe:

Sneaky Green Potato Puffs

  • 1 1/2 pounds russet potatoes, cut into 1 inch pieces
  • 6 ounces mild leafy greens (arugula, baby spinach, Swiss chard, baby kale, etc.)
  • 2 Tablespoons nutritional yeast (or) grated parmesan
  • 1 teaspoon onion powder
  • 1/2 teaspoon garlic powder
  • 1/2 teaspoon dried thyme (dill would also be great!)
  • 1 teaspoon salt or less to taste
  • Fresh ground black pepper to taste
  • 2 Tablespoons milk (I used soy milk)
  • 2 tablespoons potato starch, corn starch, or all purpose flour

Preheat oven to 425F.

Add diced potatoes to a large saucepan or pot and cover with cold water. Bring to a boil and cook for 8-10 minutes or until potatoes are tender. Lift the potatoes from the pan with a slotted spoon and put them in a large mixing bowl.

Add the greens to the pan. Cover and cook for an additional 2-3 minutes. Remove the greens from the pan with the slotted spoon and put them in a blender or food processor. Add about 1/4 cup of the cooking liquid from the pan and process until the greens are finely chopped.

Mash the potatoes in the bowl. Add the greens and all of the remaining ingredients and mix well. Scoop the mixture onto an oiled baking sheet or a baking sheet covered with parchment paper or a silicone mat.

Bake for approximately 30-35 minutes, until lightly browned. Serve as is or with a dipping sauce like honey mustard or ranch dressing.

Let me know if you try these and what your family thinks of them.


Super Split Pea Soup

I got a nice size Amazon gift certificate for Christmas and used it to pick up some cookbooks I’ve been eyeing.  One of them was “Straight Up Food” by Cathy Fisher which features plant based recipes using no sugar, oil, or salt.  Very healthy!

I’m working my way through the soup chapter and the first recipe I prepared was a Split Pea and Yam Soup. It was an easy one pot meal that got the thumb’s up from my hubby. He and I both enjoy thick, hearty soups and this one did not disappoint us.  It’s filling!

I followed the steps exactly as written but I did make some changes to the ingredients; substituting my home prepared vegetable broth for the water and kale for Swiss chard.  I also added a generous grind of fresh black pepper and 1/2 teaspoon of turmeric to the spice mixture.

The soup starts with dried split peas that get some pre-cooking before adding additional ingredients.

img_2290[1]

Once the peas have cooked for a bit you throw in the vegetables and spices. Yes, I did add a touch of salt by using celery salt instead of ground celery seed.  It was still far less than would be present in a commercial, canned soup.

img_2289[1]img_2291[1]

After the vegetables and spices go in the soup cooks for an additional 20 minutes or so until the potatoes are tender.

img_2293[1]

During that time I chopped a big pile of kale. I sometimes buy the pre chopped bag but still go through and remove all of the tough stems. Here’s the bag I can find at my local grocery store and you can see those pesky stems!

IMG_2204[1]img_2294[1]

The kale got added in the last 10 minutes and cooked just long enough to soften.  It always amazes me how many greens you can melt into a big pot of soup. When the weather is cold and chilled salads are not appealing this is one way to ensure that you get your leafy greens!

Here’s the before and after shot of the greens stage:

img_2295[1]img_2296[1]

Homemade soups are easy and so much healthier than what you buy in the can.  I hope you’ll give this one a try.

Here is the recipe as I prepared it.

Ingredients:

  • 8 cups low sodium or no salt added vegetable broth
  • 1 medium sweet yellow onion, chopped
  • 1 medium sweet potato, chopped
  • 1 medium yellow potato, chopped
  • 2 ribs celery, sliced crosswise about 1/4 inches wide
  • 1 1/2 teaspoons dried oregano
  • 1 teaspoon granulated garlic
  • 1/2 teaspoon ground cumin
  • 1/4 teaspoon celery salt
  • 1/4 teaspoon turmeric powder
  • Freshly ground black pepper to taste
  • 5-6 cups coarsely chopped fresh kale

Preparation:

Add dried split peas and broth to a large pot and bring to a boil over high heat.  Reduce the heat to medium-low and cover.  Cook for 30 minutes, stirring occasionally.  Stir in the onions, potatoes, celery, and spices.  Return to a boil over medium high heat.  Reduce heat to medium low and cook, uncovered, for about 20 minutes or until potatoes are softened.  In the last 10 minutes of cooking, stir in the kale.

If you try this recipe please let me know what you think.


Fall for This Salad


You don’t have to give up those healthy salads just because the weather is cooling off. Just make them more seasonal and warm them up a bit by adding roasted vegetables. I made this kale salad with roasted caramelized sweet potatoes and onions for lunch yesterday.

IMG_2208[1]

Although I grow kale in my garden I have used it all up. I thought I would make my life easier by buying a bag of the pre-chopped stuff but I still thought the pieces were too big. I will go back to buying it in bunches and chopping it myself.

IMG_2204[1]

I cut the sweet potatoes into bite-sized pieces and measured out just one tablespoon of vegetable oil to toss them with.  I like to do this right on the cookie sheet if I am roasting to save on dishes.  The onion went in the oven too.

IMG_2195[1]  IMG_2197[1]

It took about 40 minutes at 375 to cook the squash and get it to caramelize.  I turned it over once about halfway through the cooking time.  I put my pecan halves in the oven for the last 8-10 minutes to toast them.

I’ve been using a lot less oil lately and it can be challenging when it comes to salad dressings. For this salad I made Dreena Burton’s Magical Applesauce Vinaigrette which contains no oil or nuts. For my own little twist I used some Red Apple Balsamic Vinegar from one of those fancy olive oil and vinegar stores. I also left out the miso that was called for.  It’s hard to find in our area and the dressing was still good.  The next time I get to a larger grocery store I’ll pick some up and see if it makes a difference.  I also doubled the recipe so I could use my high speed blender.

IMG_2201[1]

The applesauce was an interesting ingredient but I often use it to replace the oil in baking so I thought, why not?  The spice blend of cumin and cinnamon was also unusual but it went really well with the ingredients in this salad. Everything went into my high speed blender so that the applesauce got fully emulsified.

IMG_2203[1]

Now that the kale was cut up, the sweet potatoes and pecans roasted, and the dressing made, it was time to assemble my salad.  I have learned that massaging kale can make it more tender and palatable for salads.  You can do it with a bit of salt or lemon juice but I decided to use some of my salad dressing.  I put the kale in a bowl with a couple tablespoons of the dressing and used my hands to squeeze and distribute the dressing.

IMG_2206[1]

I topped the salad with the still warm sweet potatoes and onions, the apple, pecans, and cranberries and drizzled on a bit more salad dressing for good measure.

I love eating according to what is in season and this salad satisfied my fall cravings. I hope you will try it and enjoy it.

Applesauce Vinaigrette (My Way)

  • 1/2 cup unsweetened applesauce
  • 4 tbsp apple cider vinegar
  • 2 tbsp balsamic vinegar (I used a red apple flavored balsamic)
  • 1 tsp dijon mustard
  • 1/2 tsp cumin
  • 1/4 tsp cinnamon
  • 3 tbsp pure maple syrup or more to sweeten to taste if desired
  • 1/4 tsp rounded sea salt (or more to taste)
  • freshly ground black pepper to taste


Combine all ingredients in a high speed blender and blend until very smooth. I thought the dressing was the perfect consistency as is but you could add a bit of water to thin if you like.


Veggie Heavy Pasta Salad

I made this pasta salad for a family gathering recently.  It was a perfect dish to showcase seasonal produce and it was lighter in calories than many pasta salads because the ratio of vegetables to pasta is quite high.

IMG_2079[1]

Speaking of pasta, have you seen the pastas that are made from beans?  For this salad I used a brand that is made from garbanzo beans.

IMG_2080[1]

Bean based pastas are higher in protein and fiber than grain based pastas and naturally gluten free (if you have to be concerned about that.)

My favorite thing about this salad was the dressing.  It’s a fairly simple vinaigrette flavored with lemon and dill.  I could see using it for a potato salad or as a marinade for grilled fish or chicken. Fresh dill is best here.  I don’t grow it myself but I found some at the farmer’s market and that’s actually what led me to make this recipe.

IMG_2071[1]

The prep work was simple.  The only cooking I did was to boil the pasta.  I wasn’t sure about cooking the asparagus.  I didn’t think I would enjoy it raw but I wanted it to be crisp. What I ended up doing was putting the sliced asparagus in the bottom of the colander and pouring the hot pasta and water over it.  I left it in the colander for a couple of minutes and then rinsed everything with cold water.

IMG_2074[1]

In addition to the pasta and asparagus I added thin sliced green onion, radishes, sugar snap peas, and cauliflower.  And I forgot to take a picture after the cauliflower but I think you can see that this was a very pretty and colorful salad!

IMG_2078[1]

Here’s the recipe for my Veggie Heavy Pasta Salad with Lemon Dill Vinaigrette:

Dressing:

  • 1/4 cup white wine vinegar
  • 1/4 cup light olive oil
  • Juice from 2 fresh lemons
  • 3 tablespoons fresh dill, chopped
  • 1 clove garlic, minced
  • 1 teaspoon Dijon mustard
  • 1/2 teaspoon salt
  • Black pepper to taste

Salad Ingredients:

  • 8 oz. pasta (Rotini or penne work well.  Try to keep vegetable pieces about the same size as the pasta you use.)
  • 3 green onions, sliced thin
  • 8 oz. sugar snap peas, sliced in half
  • 6 large radishes, sliced (about a cup)
  • 1 head cauliflower, cut into small florets
  • 1 bunch asparagus, cross cut into 1″ chunks

Directions:

Whisk salad dressing ingredients together.  I like to do this in the bottom of the salad bowl.  You can make the dressing ahead of time and refrigerate until you are ready to use.

Cook pasta according to package directions for “al dente”.  Place cut asparagus in bottom of colander and pour pasta and cooking water over the asparagus. (This step is optional if you don’t mind completely raw asparagus).  Rinse pasta with cold water and allow to drain. Add remaining salad ingredients to the bowl with the dressing.  Add drained pasta and asparagus to bowl and toss everything together to combine.

I’d love to hear if you try this recipe and liked it.  Please let me know!